
In my home, preparations are well underway for the colder, darker days of winter.
Along with healing plant-based remedies…
…lip balm making happens to be one of the items high on the list of priorities.
I started making my own homemade lip balm many, many moons ago.
It’s pretty safe to say, I’ll never go back to store bought! The truth is…you just can’t beat the savings of making your own. Not to mention, the health benefits of 100% pure, organic, and highly-nourishing ingredients.
It’s also super simple!
Follow my recipe below, and within a matter of minutes, you’ll have a lovely batch of balm on the counter cooling — ready to help you through the winter.
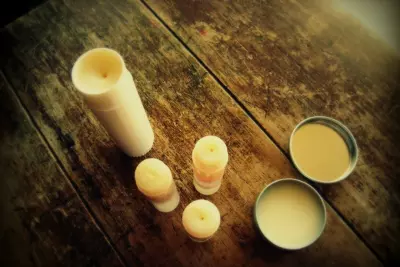
Homemade Lip Balm
Ingredients
*Whenever possible, use organic ingredients. I have linked to my favorites as examples of what to look for.
- 2 tablespoons kokum butter
- 2 tablespoon shea butter (This shea butter is the best…I’ve heated it up over low heat and melted it in with the other ingredients, and there hasn’t been any of the grittiness that some shea butter causes.)
- 1 tablespoon jojoba oil
- 2 teaspoons beeswax (to make this recipe vegan…use 1 teaspoon of carnauba wax instead of beeswax)
Optional Add-Ins
-1/4 teaspoon non-GMO vitamin E oil
-20 drops essential oils, below are my oils to use in lip balm
- 20 drops Rose Absolute
- 20 drops Peppermint
- 8 drops peppermint, 8 drops sweet orange, and 4 drops tea tree
Method
- Set up makeshift double boiler. Fill a small sauce pan with 1-2 inches of water. Warm on stove over medium/high heat.
- Place a glass measuring cup — like this one — in the middle of the pan *do not allow water to enter cup*
- Put beeswax and kokum butter in cup, melt.
- Decrease heat to low.
- Add shea butter to cup, melt.
- Remove from heat.
- Add jojoba oil and essential oils (if using) to cup.
- Stir well to combine.
- Pour into lip balm tubes (this recipe makes more than enough to fill this pack of 12 lip balm containers).
- Leave containers untouched on counter until completely hardened.
Store in a cool, dry place.
Enjoy!
 Preserving Herbs :: An All Natural, Independent Insurance Policy
Hi,
Wondering if I can use 20 drops essential lemon oil from Mt. Rose Herbs? Would that work?
Thank you,
Heather
Hi Heather! Citrus oils can be a little irritating to the sensitive skin of the lips. I’d cut back the amount of drops of lemon to 8-10. Otherwise…lemon sounds like a lovely flavor:)
Thanks so much!
What can I use in place of kokum butter?
Thanks!
Cocoa butter or mango butter would be wonderful substitutes.
i made this with the suggested Shea butter and it was gritty. Does that mean the heat was not low enough when I melted it? I would like to avoid that the next time. The grit melts quickly, but it is noticeable and I don’T think I will give any away. Thanks, love all your recipes and appreciate that you share them freely!