I have to share with you my newest, most FAVE body bar soap!!! You guys…this stuff is super AWESOME! And, coupled with oiling in the shower, using this soap has transformed my shower experience!
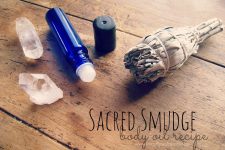
We can smudge our spaces + our homes + our bodies with the the smoke of a variety of sacred botanicals.
Now, we can smudge in the shower!
Use this handcrafted bar soap whenever you need to rid your body of negative energy. And turn your daily cleansing into a magical ceremonial ritual!
Using this Sacred Smudge soap is a wonderful way to restore positive, healing vibes with ease!
Sacred Smudge Body Bar Soap
Ingredients *It is super important to use organic ingredients when creating this soap. I have linked to the products I personally use as a reference.
Oils
- 9 ounces avocado oil
- 8 ounces coconut oil
- 8 ounces rice bran oil
- 6 ounces sunflower oil
- 3 ounces kokum butter
Liquids
- 10 ounces water
- 4.5 ounces lye (7% excess fat)
I purchase lye for soap-making online through this reputable source.
Add-Ins
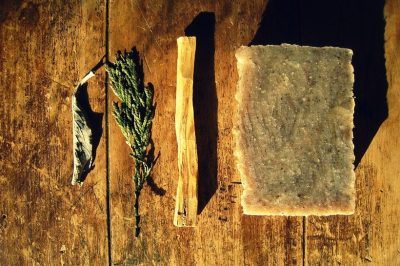
- 2 teaspoons palo santo, powdered
- 2 teaspoons white sage, powdered
- 2 teaspoons cedar tips, powdered
- 1/2-1 ounce essential oil blend of sage, palo santo, and cedarwood, optional
Method
Soap-Making Basics
Thanks to the Internet and amazing people who are willing to share their wisdom so freely…I was able to learn the skill. I primarily use the hot processed method…however, choose the method you feel most comfortable with:
- Wardeh, who runs Gnowfglins, on her personal blog Such Treasures gives the clearest, most easy to follow directions ever! This is the exact post that got me started. She uses the hot processed method and I highly recommend that you read her recipe if you are even the slightest bit interested in making your own soap.
- Renee of Fimby was also very inspirational and such a great resource! Watch her awesome video that describes the cold processed method for making a simple soap by clicking here.
If you are new to soap-making, I strongly suggest you read through these very informative articles and find what will work for you:
I would also recommend borrowing a few of these books from the library if you really find yourself wanting to know more:
- Handcrafted Soap by Dolores Boone
- The Soapmaker’s Companionby Susan Miller Cavitch
- The Natural Soap Bookby Susan Miller Cavitch

Hot Process Method
*Remember…there are 2 different methods for soap-making — hot and cold process — this is the Hot Process Method.
- Begin by grinding the botanicals, producing a fine powder. Measure palo santo (Simply use a knife to whittle off thin shavings if using Palo Santo Sticks, white sage, and cedar tips into electric grinder or mortar+ pestle — grind until powdered. Set powdered botanicals to the side.
- Measure both the lye and water – each in separate bowls — using a kitchen scale. Note: Always run your recipe through a lye calculator to be sure that you are using the proper amount of oils, lye, and liquid.
- Carefully combine the lye and water by pouring the lye into the liquid (never pour liquid into the lye) and stir liquid until lye is completely dissolved. The liquid is caustic and not to be touched in any way. The outside of the bowl will be extremely hot as well. Be careful when working with lye and follow all of the recommended precautions. Note: What I’m trying to say is, I can not be held responsible for any craziness, mishaps, explosions, etc. that may happen when making this recipe.
- Allow the lye mixture to stay under a vent and cool down while you prepare the oils.
- Measure the oils – by weight – and then place in a crock pot — or large stock pot strictly devoted to soap-making (set over the stove) — to melt on low heat.
- Once melted, add the lye/water mixture to the oils in the crock pot — or stock pot — and stir. Note: Any equipment the lye touches needs to be neutralized in a mixture of white vinegar, soap, and water.
- After a brief stir, grab your immersion blender (this is the one I use and have dedicated to soap-making) and get to work! Blend the oils and liquid in the crock pot for at least 1-2 minutes. We are working toward “trace.”
- Continue stirring and blending for 2-3 minutes more – until the mixture becomes a thick, pudding like consistency.
- Once the mixture is pudding-like, add the powdered botanicals and stir well to combine.
- Cover the crock pot/stock pot and “cook” the soap, on low heat, for approximately 1 hour.
- Prepare your mold. Note: I use these silicon loaf pans and absolutely LOVE them! This recipe is enough to fill one of these molds.
- Once the soap is done “cooking” remove from heat allow to cool on the counter for 3-5 minutes before adding the essential oils (if using).
- Stir until well combined.
- Spoon soap mixture into mold.
- Allow soap to cool and harden for 24 hours.
- Remove from mold on to cutting board and cut into bars.
- Place bars on a tray with good airflow so that they can harden further (I use these super inexpensive cooling racks to dry my soap).
***Because this is a hot processed soap…these bars are ready to use 24 hours after cutting.

 Moonrise Herbal Tea Blend :: How to Make an Herbal Sleep Aid Tea
This is really cool! I just discovered your blog today, I love it! You should add pinterest buttons to your images to make it easier for others to pin them… Thanks!
Could I just use something like organic olive oil and organic coconut oil? And use powdered white sage and sage essential oil? Perhaps with lavender too?